This is chapter 10 of a multi-part series on writing a RISC-V OS in Rust.
Table of Contents → Chapter 9 → (Chapter 10) → Chapter 11
Filesystems
Video & Reference Material
I have taught operating systems at my university, so I will link my notes from that course here regarding the virt I/O protocol. This protocol has changed over the years, but the one that QEMU implements is the legacy MMIO interface.
https://www.youtube.com/watch?v=OOyQOgHkVyI
The notes above are for filesystems in general, but it does go into more detail about the Minix 3 filesystem. The OS we're building here will probably do things differently. Most of that is because it's written in Rust--insert jokes here.
Rust Out-of-the-Box
This OS now compiles by Rust alone. I have updated Chapter 0 for the procedures on configuring Rust to compile this OS without the need for a toolchain!
Overview
Storage is an important part of an operating system. When we run a shell, execute another program, we're loading from some sort of secondary storage, such as a hard drive or USB stick. We talked about the block driver in the last chapter, but that only reads and writes to the storage. The storage itself arranges its 0s and 1s in a certain order. This order is called the file system. The file system I opted to use is the Minix 3 filesystem, which I will describe the practical applications here. For more overview of the Minix 3 file system or file systems in general, please refer to the course notes and/or video that I posted above.
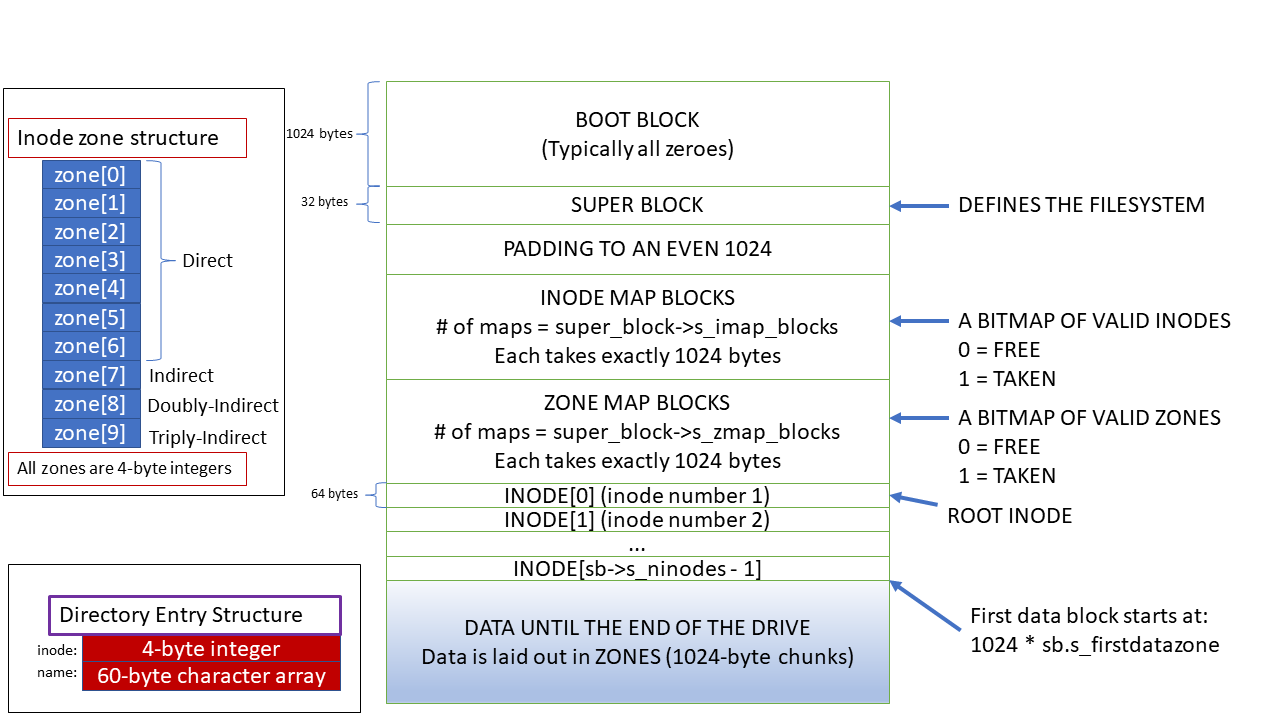
I will go through each part of the Minix 3 file system, but the following diagram depicts all aspects and the structure of the Minix 3 file system.
The Superblock
The first block of the Minix 3 file system is the boot block and is reserved for things such as bootloaders, but we are allowed to use the first block for anything we want. However, the second block is the super block. The super block is the metadata that describes the entire file system, including the block size, and number of inodes.
The entire structure of the Minix 3 file system is set whenever the filesystem is created. The total number of inodes and blocks are known ahead of time based on the capacity of the secondary storage.
Since the super block has a known location, we can query this part of the file system to tell us where we can find the index nodes (inodes), which describe a single file. Most of the content of the file system can be located by using simple math based on the block size. The following Rust structure describes the super block of the Minix 3 file system.
#[repr(C)]
pub struct SuperBlock {
  pub ninodes:         u32,
  pub pad0:            u16,
  pub imap_blocks:     u16,
  pub zmap_blocks:     u16,
  pub first_data_zone: u16,
  pub log_zone_size:   u16,
  pub pad1:            u16,
  pub max_size:        u32,
  pub zones:           u32,
  pub magic:           u16,
  pub pad2:            u16,
  pub block_size:      u16,
  pub disk_version:    u8,
}
The superblock doesn't change, and unless we're resizing the file system, we never write to the super block. Our file system code only needs to read from this structure. Recall that we can find this structure after the boot block. The default block size of the Minix 3 file system is 1,024 bytes, which is why we can ask the block driver to get us the super block using the following.
// descriptor, buffer, size, offset
syc_read(desc, buffer.get_mut(), 512, 1024);
The super block itself is only about 32 bytes; however, recall that the block driver must receive requests in sectors which is a group of 512 bytes. Yes, we waste quite a bit of memory reading the super block, but due to I/O constraints, we have to. This is why I use a buffer in most of my code. We can point the structure to just the top portion of the memory. If the fields are aligned correctly, we can read the superblock by simply referencing the Rust structure. This is why you see #[repr(C)] to change Rust's structure to a C-style structure.
Inode and Zone Bitmaps
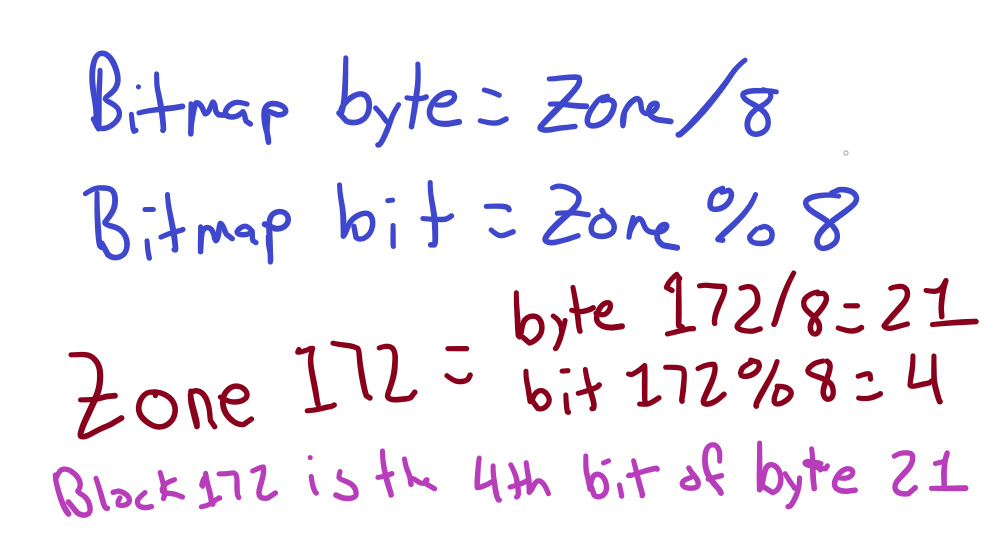
To keep track of what nodes and zones (blocks) have already been allocated, the Minix 3 file system uses a bitmap. The bitmap follows the super block and each BIT (hence a bitmap) represents one inode or one block! Therefore, one byte of this bitmap can refer to 8 inodes or 8 blocks (8 bits = 1 byte).
To demonstrate how this works, I work figuring out if zone 172 is taken or free.
When we test the 4th bit of byte 21, we will get either a 0 or 1. If the value is 1, that means that zone (block) is allocated already. If it is a 0, that means that zone (block) is free. If we want to add a block to a file, we'd scan the bitmap for the first 0 we come across. Each bit is exactly one block, so we can multiply the location of the first bit that's a 1 by 1,024 (or the block size) to see what location on the file system is free for the taking!
The Minix 3 file system has two bitmaps, one for the zones (blocks) as demonstrated above, and one for inodes (explained below).
One interesting portion of the super block is called the magic. This is a sequence of two bytes that has a defined value. When we go to this location, we should see 0x4d5a. If we don't, it is either NOT a Minix 3 file system, or something is corrupted. You can see that I check the magic number in the Rust code below.
// ...
pub const MAGIC: u16 = 0x4d5a;
// ...
if super_block.magic == MAGIC {
  // SUCCESS!
}
The Index Node (inode)
We need to be able to refer to storage elements by a name. In unix-style file systems, the metadata, such as the size and type of a file, are contained in what is known as an index node or inode for short. The Minix 3 inode contains information about a file, including the mode (permissions and type of file), the size, who owns the file, access, modification, and creation times, and a set of zone pointers that point to where the actual file's data can be found on the disk. As a side note, notice that the inode stores the file's size as a u32, which is 4 bytes. However, 2^32 is about 4 GB, so we can't address more than about 4 gigabytes of data in any single file.
Most of these file systems follow what is known as an indexed allocation. This is unlike the usual go-to file system for OS tutorials, which is the file allocation table (FAT). With the indexed allocation, our pointers point to certain blocks of data on the disk. You see, a block is the smallest addressable unit in the file system. Everything is made up of blocks. For purposes of our OS, all blocks are chunks of 1,024 bytes. So, if I have two files, one is 10 bytes and the other is 41 bytes, both will take exactly 1,024 bytes. For the first file, the first 10 bytes contain the file's data and the rest contains nothing. The file can be expanded inside of this block. If a file exceeds a block size, another one must be allocated and pointed to by another zone pointer.
Zone Pointers
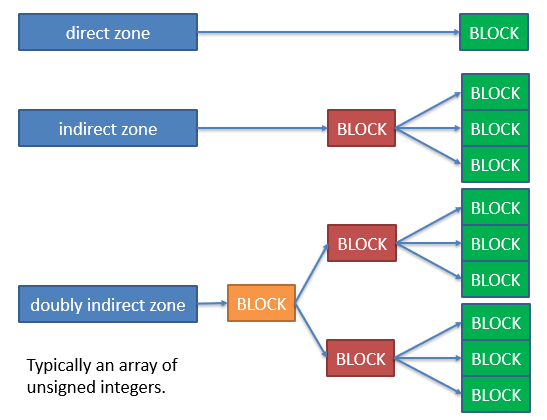
There are four types of zone pointers in the Minix 3 file system: direct, indirect, doubly-indirect, and triply-indirect. Direct zones simply are a number we can multiply by the block size to get the exact block location. However, we only have 7 of these, meaning that we would only be able to address 7 * 1,024 (block size) ~= 7KB of data! This is where the indirect zone pointers come from. The indirect zone pointers point to a block where more zone pointers can be found. In fact, there are 1,024 (block size) / 4 = 256, number of pointers per block. Each pointer is exactly 4 bytes.
The red and orange blocks don't contain any data that pertains to the file. Instead, these blocks contain 256 pointers. The singly-indirect pointer can address 1,024 * 1,024 / 4 = 1,024 * 256 = 262 KB of data. Notice that we went from about 7 KB with 7 direct pointers to 262 KB with a single indirect pointer!
A doubly-indirect pointer is even more. The doubly indirect pointer points to a block of 256 pointers. Each one of those 256 points points to yet another block of 256 pointers. Each of these pointers then points to a block of data for the file. This gives us 1,024 * 256 * 256 = 67 MB, which is about 67 megabytes of data. The triply indirect pointer is 1,024 * 256 * 256 * 256 = 17 GB, which is about 17 gigabytes of data!
The Rust code gets a little disorganized when we get to the doubly and triply indirect pointers. We have nest loops inside of nested loops! The direct pointers are quite simple, as you can see below.
let zone_offset = inode.zones[i] * BLOCK_SIZE;
syc_read(desc, block_buffer.get_mut(), BLOCK_SIZE, zone_offset);
A direct pointer is multiplied by the block size. That gives us the offset of the block. That's it! However, as shown in the code below, we have to go a step further when reading the indirect zone, which is the 8th zone (index 7).
syc_read(desc, indirect_buffer.get_mut(), BLOCK_SIZE, BLOCK_SIZE * inode.zones[7]);
let izones = indirect_buffer.get() as *const u32;
for i in 0..num_indirect_pointers {
  if izones.add(i).read() != 0 {
    if offset_block <= blocks_seen {
      // descriptor, buffer, size, offset
      syc_read(desc, block_buffer.get_mut(), BLOCK_SIZE, BLOCK_SIZE * izones.add(i).read());
    }
  }
}
Why the 0s? In Minix 3, as we write files or overwrite portions of files, they will become fragmented, meaning that the data for the file will be disbursed in non-contiguous blocks. Sometimes we just want to get rid of a block altogether. In this case, we can set the zone pointer to 0, which in Minix 3 means "skip it".
The doubly and triply indirect zones have one more and two more for loops, respectively. Yep, nice and easy to read, right?
Directory Entries
Notice that the inode does not have any name associated with it, yet we always access files by name. This is where the DirEntry structure comes into play. You see, multiple names can be given to a single file. These are called hard links. The following Rust structure shows how the directory entries are laid out.
#[repr(C)]
pub struct DirEntry {
  pub inode: u32,
  pub name:  [u8; 60],
}
Again with the #[repr(C)] to represent the structure as a C-style structure. Notice that we have a 4-byte (32-bit) inode follwed by a 60-byte name. The structure itself is 64 bytes. This is how we associate an inode with a name.
Where are these directory entries stored? Well, recall that the mode of an inode tells us what kind of file it is. One particular type of file is called a directory. These still have a size and blocks associated with it. However, when we go to the blocks, we find a bunch of these DirEntry structures. We can start at inode 1, which is called the root inode. It is a directory, so when we read the blocks, we will find 1,024 / 64 = 16 directory entries per block. Each file, regardless of its type, gets a directory entry somewhere. The root node only has directory entries that are immediately under the root directory. Then, we would go to another directory, say /usr/bin/ and read the "bin"'s directory entries to find all of the files contained in that directory.
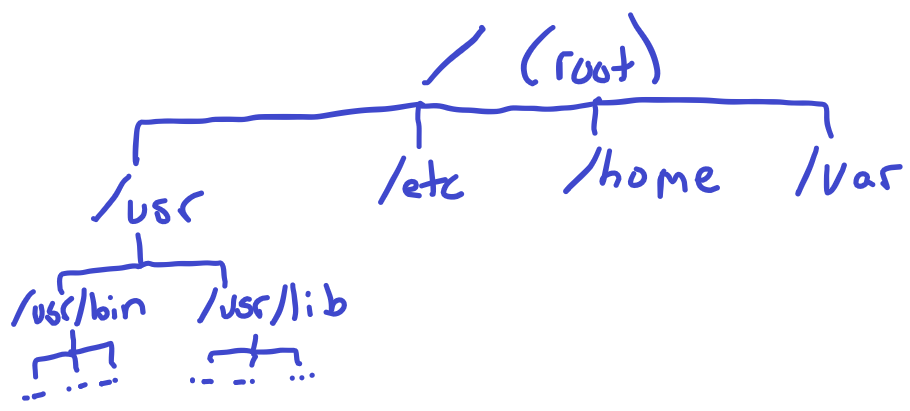
Laying out the directory entries gives the file system a hierarchical (tree-like) structure. To get to /usr/bin/shell, we must first go to the root /, then the usr directory /usr, then find the bin directory /usr/bin, and finally find the file shell /usr/bin/shell. The /, usr, and bin will have an inode associated with them and their mode will tell us that these are directories. When we get to shell, it will be a regular file, also described in the mode.
These directories can be placed in ANY block, except for the root directory /. This is always inode #1. This gives us a firm and known starting point.
Our OS's Filesystem Read Process
Recall that the block driver makes a request and sends it off to the block device. The block device services the request and then sends an interrupt when it's finished. We don't really know when that interrupt will come, and we can't wait around for it. This is why I decided to make the file system reader a kernel process. We can put this kernel process in the waiting state so it won't be scheduled until the interrupt is received from the block device. Otherwise, we'd have to spin and poll to see if the interrupt was ever sent.
pub fn process_read(pid: u16, dev: usize, node: u32, buffer: *mut u8, size: u32, offset: u32) {
  let args = talloc::().unwrap();
  args.pid = pid;
  args.dev = dev;
  args.buffer = buffer;
  args.size = size;
  args.offset = offset;
  args.node = node;
  set_waiting(pid);
  let _ = add_kernel_process_args(read_proc, args as *mut ProcArgs as usize);
}
Since our block driver now needs to be aware of the process waiting on an interrupt, we have to add a watcher, which is the process that it'll notify of an interrupt. So, our block operation function is prototyped as:
pub fn block_op(dev: usize, buffer: *mut u8, size: u32, offset: u64, write: bool, watcher: u16) -> Result<u32, BlockErrors>
As you can see, we've added another parameter, the watcher. This is the PID of the watcher and NOT a reference. If we used a reference, the process would be required to remain resident while in the waiting state. Otherwise, we will dereference invalid memory! Using the pid, we can look up the process by the process ID. If we don't find it, we can silently discard the result. This still leaves the possibility of a null buffer, but one thing at a time, ok?
Now, when we handle the block device's interrupt, we have to match the watcher and awaken it.
let rq = queue.desc[elem.id as usize].addr as *const Request;
let pid_of_watcher = (*rq).watcher;
if pid_of_watcher > 0 {
  set_running(pid_of_watcher);
  let proc = get_by_pid(pid_of_watcher);
  (*(*proc).get_frame_mut()).regs[10] = (*rq).status.status as usize;
}
The regs[10] is the A0 register in RISC-V. This is used as the first argument to a function, but it's also used as the return value. So, when the process awakens and continues after the system call, the A0 register will contain the status. A status of 0 means OK, 1 means I/O error, and 2 means an unsupported request. These numbers are defined in the VirtIO specification for block devices.
A good thing to do here is to check if get_by_pid actually returns a valid Process pointer, since we're bypassing Rust's checks.
Testing
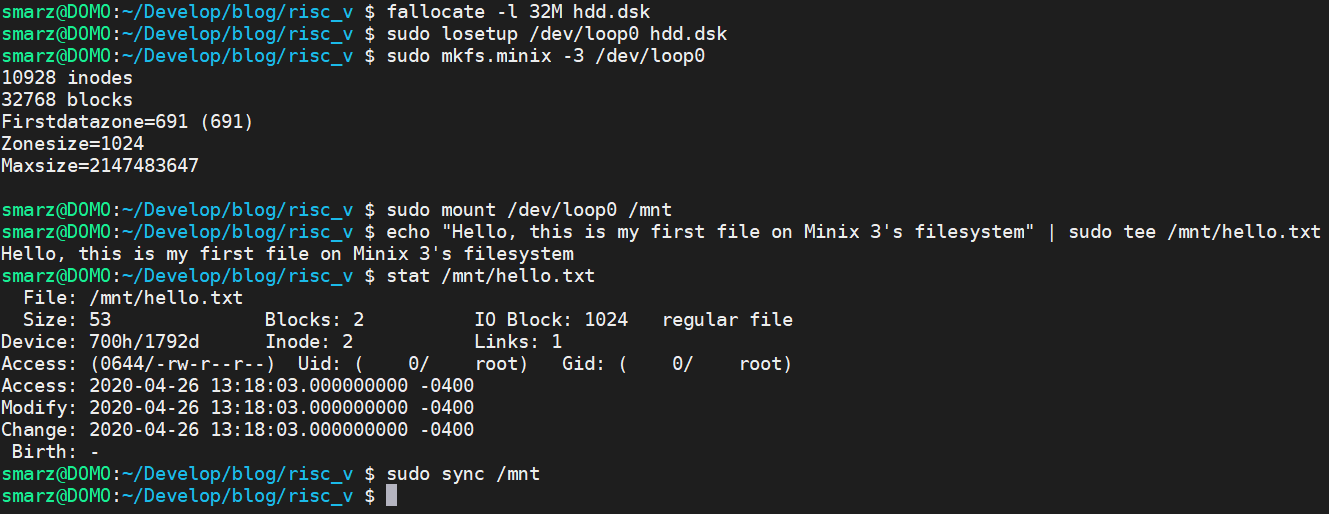
We need hdd.dsk to have a valid Minix 3 file system. You can do this on a Linux machine, such as Arch Linux that I use. You can set up a file to be a block device using losetup.
The fallocate command will allocate an empty file. In this case, we specify a length (size) of 32 MB. Then, we tell Linux to make our hdd.dsk a block device by using losetup, which is a loop setup. Whenever we read/write the block device /dev/loop0, it'll actually read/write the file hdd.dsk. We can then make the Minix 3 file system on this block device by typing mkfs.minix -3 /dev/loop0. The -3 is important because we're using the Minix 3 file system. Minix 1 and 2 do not follow all of the structures I presented in this tutorial.
After the filesystem is built, we can mount it in Linux by using mount /dev/loop0 /mnt. Just like any file system, we can read/write into this new file system. Since our OS can't find an inode by name, yet, we have to specify it by the inode number. If we look on the third line after stat in the middle we can see Inode: 2. This means if we read inode #2, we will find all of the information necessary to read out Hello, this is my first file on Minix 3's filesystem. When we read this inode, we should get a file size of 53, and a mode of 10644 (in octal). The permissions are 644 and the type is 10 (regular file).
You can unmount and delete the block device by using the following commands:
sudo umount /mnt
sudo losetup -d /dev/loop0
Now, in main.rs, we can write a little test to see if this worked. We need to add a kernel process, which is like a normal process except we run in Machine mode. In this RISC-V mode, the MMU is turned off, so we deal with only physical addresses.
fn test_read_proc() {
  let buffer = kmalloc(100);
                                  // device, inode, buffer, size, offset
  let bytes_read = syscall_fs_read(8, 2, buffer, 100, 0);
  if bytes_read != 53 {
    println!("Read {} bytes, but I thought the file was 53 bytes.", bytes_read);
  }
  else {
    for i in 0..53 {
      print!("{}", unsafe { buffer.add(i).read() as char });
    }
    println!();
  }
  kfree(buffer);
  syscall_exit();
}
Extending System Calls
As you can see, we use syscall_fs_read and syscall_exit above for a kernel process. We can define these in syscall.rs as follows.
fn do_make_syscall(sysno: usize,
                   arg0: usize,
                   arg1: usize,
                   arg2: usize,
                   arg3: usize,
                   arg4: usize,
                   arg5: usize)
                   -> usize
{
	unsafe { make_syscall(sysno, arg0, arg1, arg2, arg3, arg4, arg5) }
}
pub fn syscall_fs_read(dev: usize,
              inode: u32,
              buffer: *mut u8,
              size: u32,
              offset: u32) -> usize
{
  do_make_syscall(63,dev,inode as usize,buffer as usize,size as usize,offset as usize,0)
}

pub fn syscall_exit() {
	let _ = do_make_syscall(93, 0, 0, 0, 0, 0, 0);
}
If we look at the code in asm/trap.S, at the bottom, we will find make_syscall. I assigned 63 as the read system call and 93 as the exit system call to match libgloss of newlib.
.global make_syscall
make_syscall:
  mv	a7, a0
  mv	a0, a1
  mv	a1, a2
  mv	a2, a3
  mv	a3, a4
  mv	a4, a5
  mv	a5, a6
  ecall
  ret
The number 63 is the read() system call in the libgloss library, which is part of newlib. This will perform the following:
let _ = minixfs::process_read(
        (*frame).pid as u16,
        (*frame).regs[10] as usize,
        (*frame).regs[11] as u32,
        physical_buffer as *mut u8,
        (*frame).regs[13] as u32,
        (*frame).regs[14] as u32
);
The system call number is now in register A7 (moved by make_syscall assembly function). Registers 10 through 14 (A0-A4), store the arguments for this system call. When we call process_read here, it will create a new kernel process to handle reading from the filesystem. Recall, we do this so that the block driver can put us to sleep while waiting for a reply from the block device.
Conclusion
The Minix 3 filesystem took over after Minix version 1 and 2, which were educational. The Minix 3 filesystem is quite a legit file system. All of the structures you see here are legitimate and can be read from a filesystem made with mkfs.minix on a Linux machine.
Table of Contents → Chapter 9 → (Chapter 10) → Chapter 11

